
The procedure is therefore for you who have received a document, whether you are the sender and recipient, or just the recipient.
E-mail and e-mail content
SMS and SMS content
The signing window - When opening the documents
E-mail and e-mail content
The recipient of documents for signature will receive either an email, SMS, e-Boks or digital post. The email, e-Boks and digital post look the same, however an SMS will act like a normal SMS with a link.
We will go through the elements of the email below:

- Subject field - a one-liner explaining about the document or process
- Sender - Here will be the name of the sender from the company (The e-mail will always be a no-reply@vismaaddo.net e-mail and therefore cannot be answered)
- Logo - Company logo
- Message text - A text that explains either about the document, the process or the company
- Open documents button - This is used to access the documents in the transaction
- E-mail content related to the transaction
E-mail content
In the e-mail content, various information is noted that the sender has decided should appear in the message.
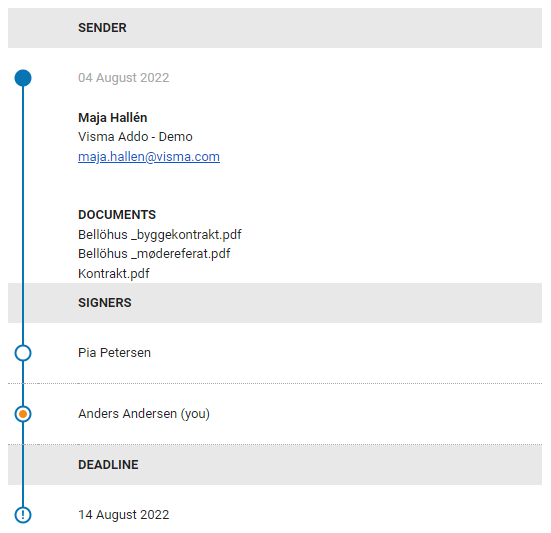
- Sender name - This shows the name of the sender
- Company name - This shows the name of the company
- Sender email - This shows the email of the sender
- Sender phone number - This shows the number of the sender
- Documents - All documents that appear in the transaction, attachments or documents that need to be signed
- Signers - All signers of the transaction. If there are numbers off to the side of the persons, this means it is a sequential signature and therefore if you have been given the document to sign, it is your turn in the sequence to sign.
- Expiration date - This tells what date is the last for the signer to have the opportunity to sign. If this is exceeded, the document cannot be accessed.
SMS and SMS content
An SMS does not contain as much information as an e-mail, but it will still be possible to see who sent the message, etc.

- Company name - Company name appears as sender. However, it is not possible to reply to this SMS
- Message text - The message text is the description that the sender of the document has chosen for the mailing that you have received
- Link to documents - This link is used to access the documents for signature that have been sent to you
- Company name and sender name - This will usually include the company name and the name of the sender of the documents.
The signing window - When opening the documents
Once you have received a message that documents are ready for signing, they can be accessed via the link you have received.
Therefore, when you click on the link, you will be presented with the documents that are relevant to you, both attachments and documents for signature.
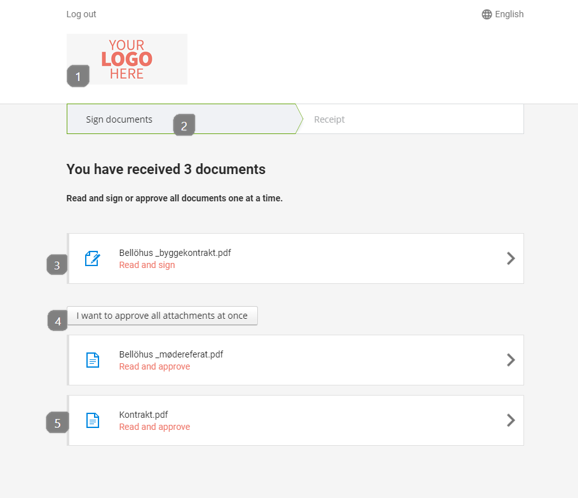
- Company logo
- The process - Most often there will be only 2 steps: signature and receipt. However, the company may have added more steps to the process, possibly answering individual questions. This will be indicated in the process line.
- Documents for signature - These documents will appear with a "Read and sign" text
- "I want to approve all attachments at once" - If this function is visible, you can approve all attachments without the need to open them
- Attachment - Attachments will appear at the bottom of the signature window and with a text: "Read and accept"
To proceed, simply tap on one of the documents or "I want to approve all attachments at once".
After clicking on one of the documents, you will be presented with the content of the document and some of its functions.
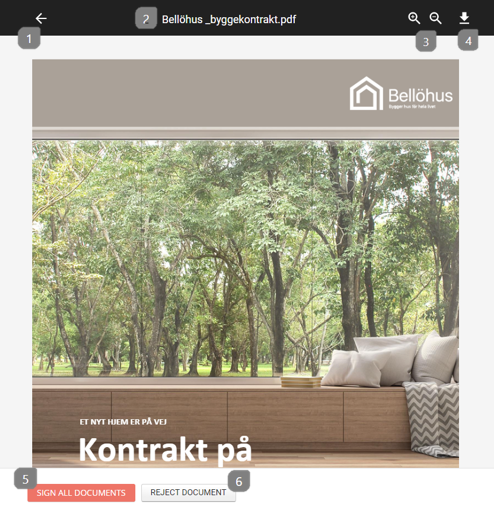
- Return button - Press to go back to all attachments and documents
- Title of the document
- Zoom in and out - Can be used to enlarge or reduce the content of the document
- Download - Can be used if you want to download the document to your computer
- Sign/Approve - Used to sign documents or approve attachments. If you choose to sign you will be given the option to sign in the way the sender has chosen. See the Overview over authentication- and signing methods.
- Reject document - If you disagree with the content, you can tap here and give a reason for the rejection.
Note: All documents must be signed, all attachments must be approved and if enabled: all simple questions must be answered before a transaction is completed.
Once all the documents are signed, the documents will be sent to the sender and if you were the last person to sign the transaction, it will be completed. You should now receive the signed documents by email.