
The benefits of digital signatures are many. You save a lot of time collecting signatures, especially if multiple parties and documents need to be signed. In addition, you can streamline and automate work processes, simply and securely.
Below we will take you through, step by step, how to use Addo Sign to send your first document for digital signature. To send a document, we start at the front page. From here we can add the signer(s), document(s), copy recipient(s) and reference number.
Note! It is your templates that set the requirements for the sending. Most of these presets can be changed for each new sending, as shown below. You can read more about templates here.
4 steps for sending your document
Step 1. Add signer(s)
Step 2. Upload document(s)
Step 3. Recipients of copy and reference number
Step 4. Messages to signers
Extra: Set logo and company colour
Add signer(s)
The first thing you need to do is add the signer(s) to the transaction. Transaction is our term for the total signing flow including documents, to be signed by one or more parties. To add signatories to a new transaction, we start on the front page under "New signing". We then add a signer and select the settings for the transaction. We will guide you through this below. It is at any time possible to create templates that pre-define these settings. We recommend that you do this once you have tested the system and know how you want your processes set up.
When a signer is added, a pop-up window will appear with the various settings that affect the signer in the transaction. To start with, insert name, email and title (if applicable).
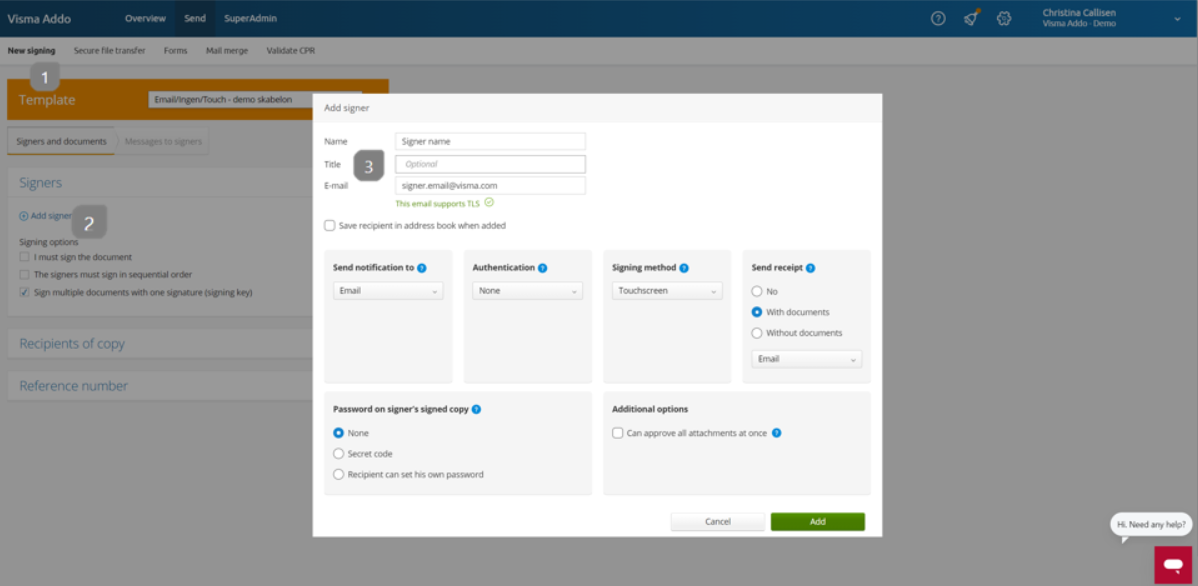
- Select New signing
- Select Add signers
- Fill in the name and email of the signer. If the title is relevant, you can fill that in as well. It is, however, not mandatory
Note: if you had chosen either SMS or e-Boks as your notification method, you would have needed a phone number or a social security number, respectively.
Next, you need to determine which settings should apply to the signer. Below is a brief overview, with links to more in-depth guides and articles.
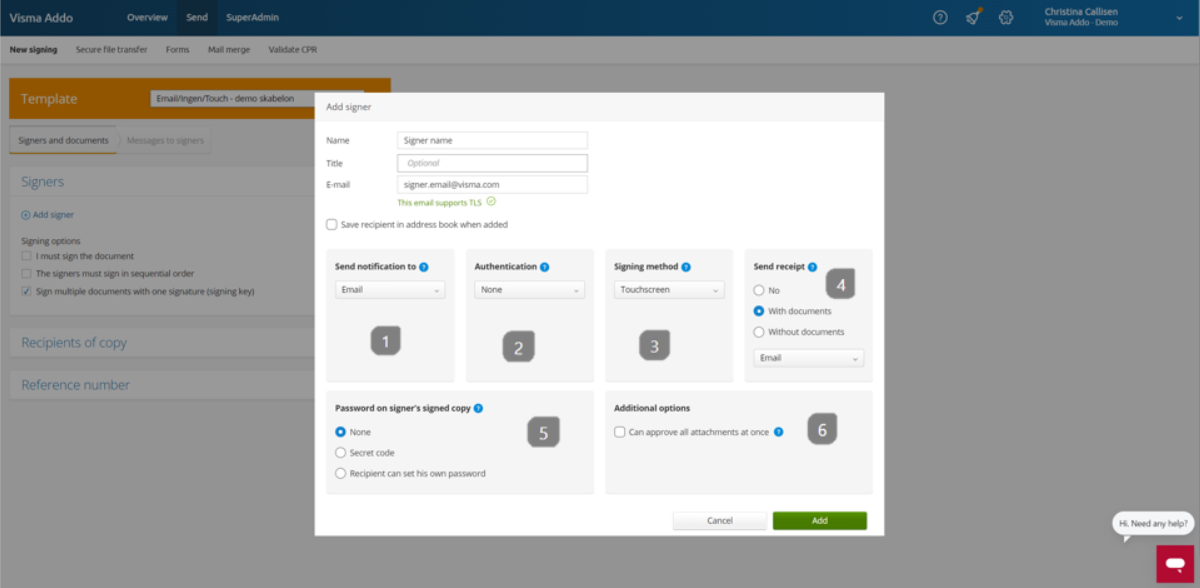
- The notification method determines how the signer is notified. Here you can choose between none, email, SMS, email and SMS, eBoksor Digital Post. Please note that eBoks and Digital Post must be purchased before you can use them and that eBoks can be purchased by private individuals and Digital Post by public authorities.
- The identification method determines whether the signer must identify themselves before they can view the document
- The signature method is the method used to sign the document. There are several options here, which you can find more information about here
- This field determines whether the signer should receive a receipt after signing, and if so, whether the signed document should be attached to the receipt mail
- A passwordcan be added to the final signed document, which must be used before it can be opened
- Under other options, you can choose to have the signatory "can approve all attachments at once". This is only recommended for signatories who are either internal or have read the documents before, as it does not need to click through all the attachments
Once the options are selected, the signer is added

- Press add to have the signer added to the transaction. This process is repeated for each signatory
You can now proceed and add the documents to be signed.
Upload document(s)
In Addo Sign you can have the documents signed and the attachments approved simultaneously. Below we show you how to do this and differentiate between a document that needs to be signed and a document that just needs to be approved as an attachment.
Have your documents ready. They can either be dragged into Addo or opened via the finder.
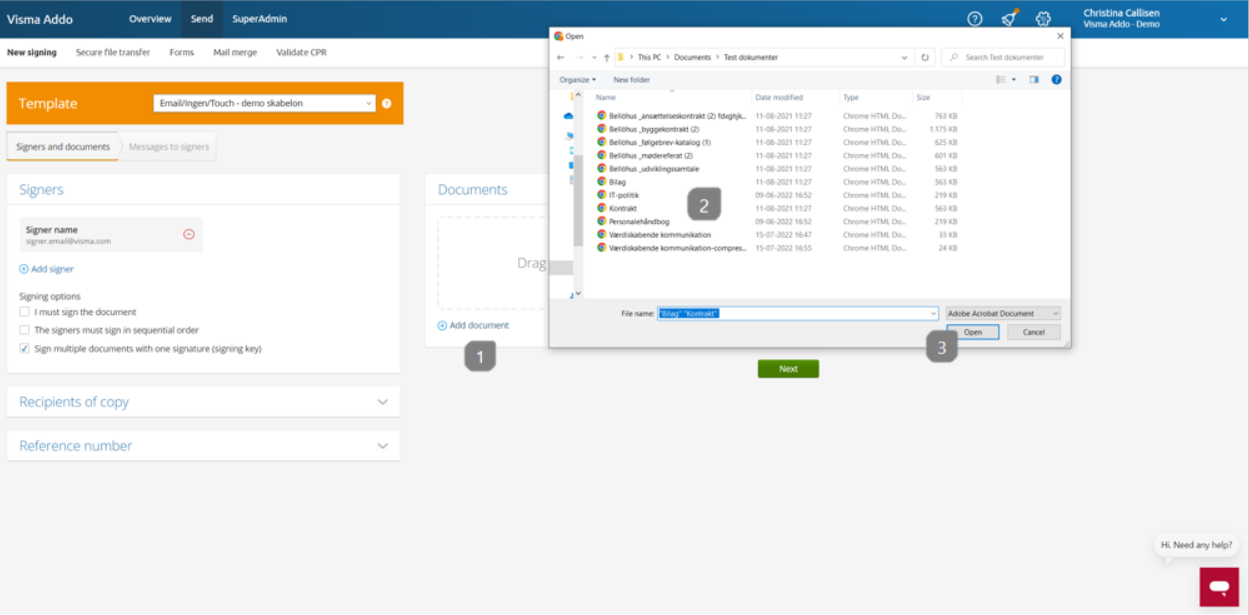
- Select Add document
- Choose the document(s) to be uploaded
- Once marked, select Open
Once the documents are uploaded, you can select whether they should be signed or attached. Attachments are documents that simply need to be approved. They do not get a signature stamp, but it will appear in the activity log that the attachment has been approved.
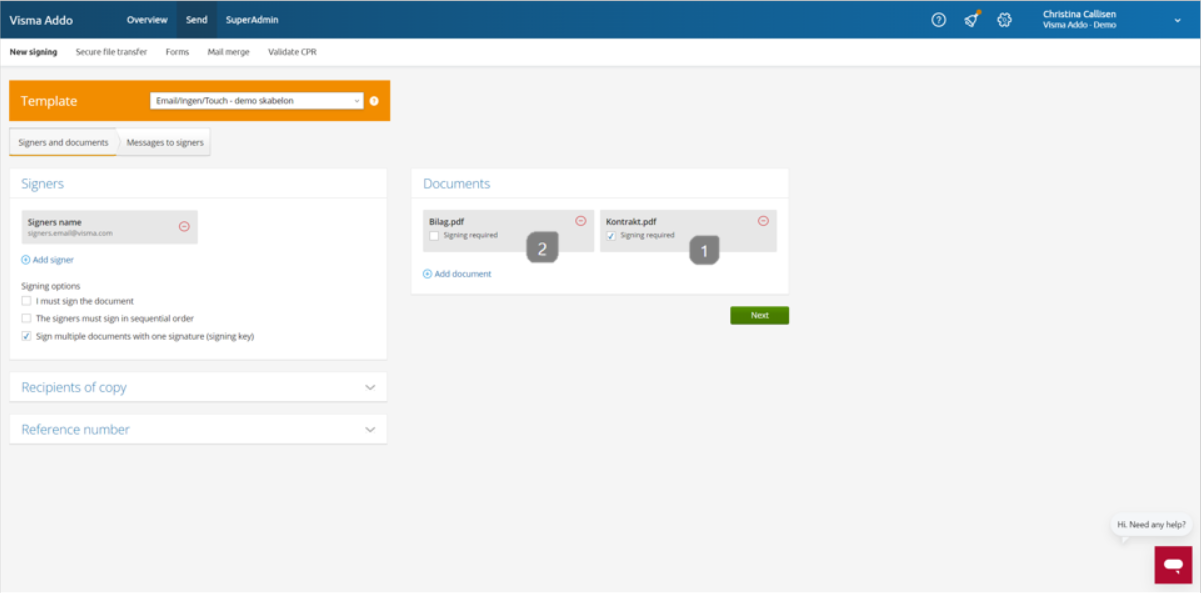
- If "signing required" is checked, it is a document to be signed. A signature stamp will be added on an extra page
- If "signing required" is not checked, the document is an attachment
Note: at least one document must have "signing required" checked
You can now click "next" to proceed if you do not need recipients of copy or reference number
Recipients of copy and reference number
Now you've got the basics down, but there are a few more options. In Addo Sign you have the option to add a copy recipient who does not have to sign, but just receives a copy of the signed document when everyone has signed.
To add one or more copy recipients, you must first click on the "Recipients of copy" field.
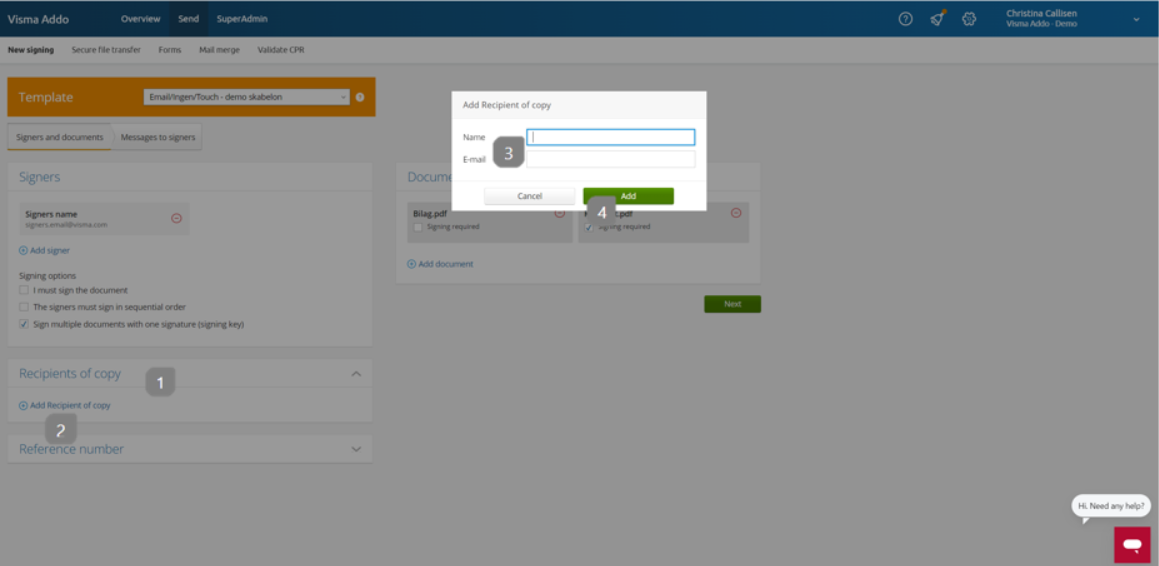
- Select Recipients of copy
- Select Add recipient of copy
- A pop-up box will appear. Type the name and email of the copy recipient
- Choose Add
You now have the option to add a reference number. The reference number is used for your internal purposes, and can therefore be anything from a name to a system or case number. The purpose is to give you a better overview in the transaction overview.
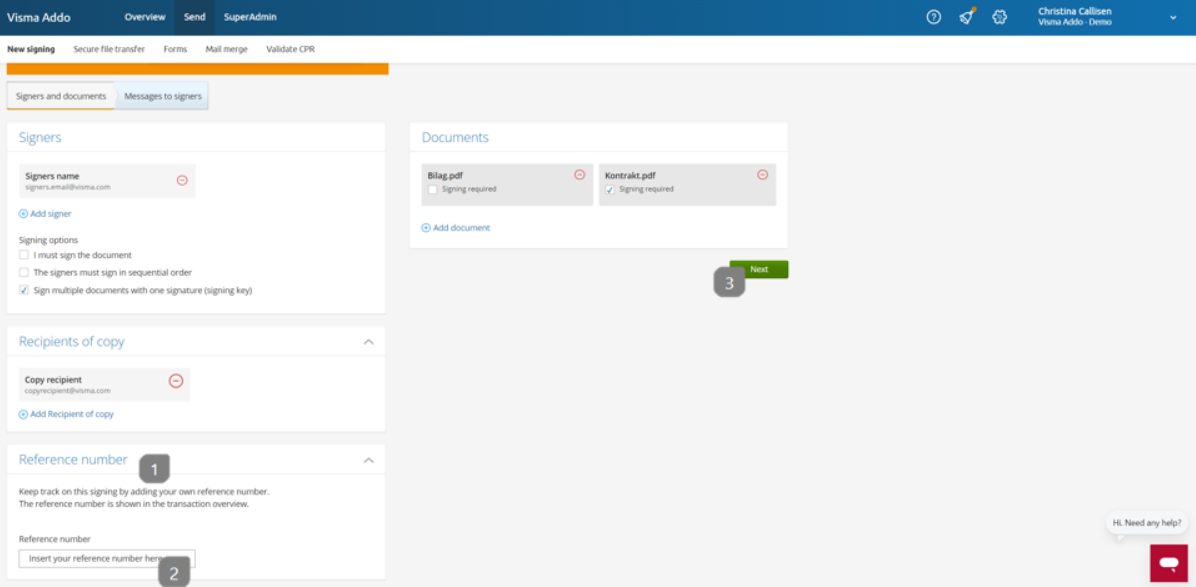
- Select reference number, to have the box unfold
- Insert your chosen reference number
- Select next, to proceed to the signing messages
Messages to signers
Different messages are sent to the signerr at different points in the transaction flow. The different ones are discussed below.
Note: Messages cannot exceed 1.000 characters.
In a transaction, depending on your settings, both an invitation message, a reminder message and a receipt message are sent. You can read more about the messages here.
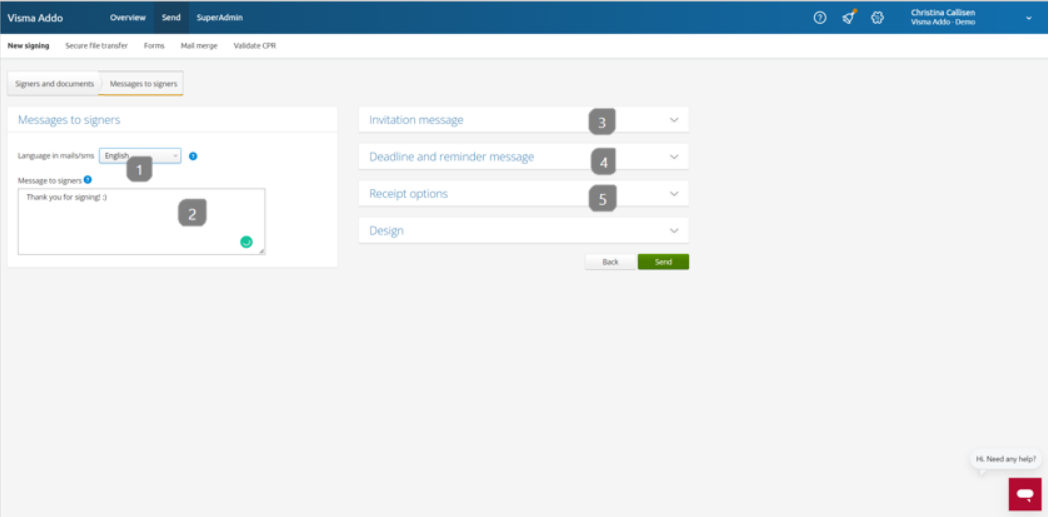
- It is possible to set the language of the default messages. Note that if you change the wording from the default messages in one language, you must also change the wording in another language
- Here you can write a message, which the signer will get on the page when it is signed. The message will not be sent as an e-mail like the other messages but as a message on the page itself
- The invitation message is the first email/SMS the signatory receives
- Deadline and reminder message is a message sent to the signatory after x number of days if no signature has been received. It also sets the signature deadline, which is explained below
- The receipt options is the last message the signer receives, confirming that a signature has been made. This depends on the settings selected for the signer
The deadline for signing, as well as the advisory interval, are set under deadline and reminder messages. Here you can choose how many days the signer has to sign, how often they should receive a reminder and when the last reminder should be sent.
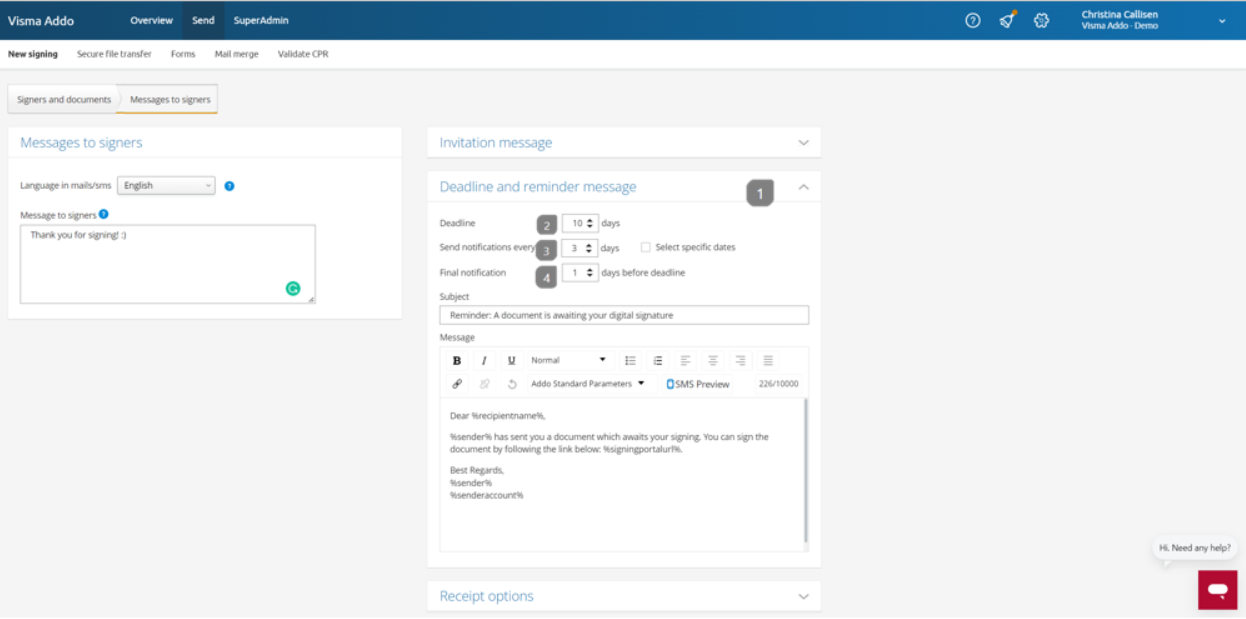
- Select deadline and reminder message to unfold the settings
- Deadline is the number of days the signer have before the transaction expires
- Send notification every determines how often a reminder message should be sent. If you choose "3", the signer will be notified every third day, as long as the transaction is active
- Final notification determines when the last reminder will be sent
Logo and company colour
As the last box on the message page, you can see what logo will be on the sent emails, as well as what colour the emails will contain. If you have already uploaded a logo to your account, this logo will be used. It is also possible to upload different logos for different templates if you have several companies, for example. You can read more about design, logo and company colours here.